Sunday, March 25, 2012

Coat Closet Clean-Up

     Hello everyone!  We had a very rainy weekend and I thought, what better way to spend a dreary day than to tackle a small organizational project.  As much as I admire those homes where the owners have every space perfectly organized, my home is far from it.  We have a very hard time keeping everything in its proper place.

     There is no better example of our disorganization than what is
 behind this closet door....


     This is our foyer coat closet.  It is not very big and is used solely for collecting our shoes and coats when we get home.  However, as you can see, the shoe situation has seriously gotten out of hand.....


     I know....YIKES!  It is pretty funny when you consider the fact that we actually have a shoe rack, yet most of the shoes are strewn about.

     I kept a basket on the top rack with the idea that it could hold winter hats, gloves and scarves.  As you can see, the shelf actually holds a computer bag, some random plastic bags, a baseball cap, and an American flag scarf (don't ask, I have no idea why we have this either).....


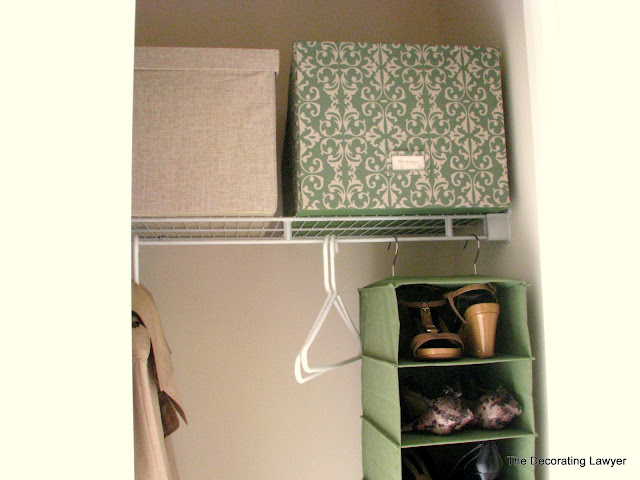
     Clearly, this closet needed a makeover so that it could be functional again.  A trip to The Container Store brought the much needed organization that this little closet desired. 


     Awwww much better.  The green container on the top shelf holds handbags and the natural fabric box replaced the basket full of winter accessories.  It has a lid, which not only keeps the space tidier, but helps keep dust off of its contents through the Spring/Summer months. 

     I can definitely breath easier knowing that every time I open this closet I will be able to find my shoes with ease.  Now we just have to make the effort to keep it up.   Were you able to keep the look of your organizational projects, or did you fall back into your old habits? I'd love to hear from you all!

                                                                                                       -Molly

Sunday, March 18, 2012

How to Make Pom Poms

     Some of you have been asking when I am going to post photos of the baby's room.  I promise to have photos up VERY VERY SOON!  Part of the delay has been my search for something special to place over the baby's crib.   I am not a huge fan of the popular plastic mobiles that most baby stores sell.  Rather, I want something eye catching and whimsical, but also budget friendly. 

     So one day, while doing a search on the web, I came across the idea of pom poms.  You know, those fabulous tissue paper flowers we all learned to make in the 80s.  Well, they are back in style and are a very popular decoration at weddings, baby showers, and now nurseries. 

     I love this idea!  Not to mention they are super cheap to make.  '

     Since I am making them for the baby's room, I chose tissue paper in bright pink, pastel pink and white. 

     You will need 8  (20 x 20) or (20 x 26) inch pieces of tissues paper per pom pom, scissors, and 18 inch floral wire.  Lay your tissue paper out flat and begin folding the paper in 1 1/2 inch accordion style folds.  Just like this....


     Next, take a piece of your floral wire and fold it at the half way mark on your folded paper.  Twist the remaining wire to keep it from slipping.  Just like you see here....


     Then trim the edges of your tissue paper with either a rounded or pointed edge.  I chose a round edge as seen here....


      "GENTLY" pull each piece of tissue paper apart and fluff.  The tissue paper is very delicate so go slow or you could easily rip the paper. 


     When you are done it should look something like this....


     So far I have hung three.  I may choose to add a couple more.  Although, sometimes less is more.  I chose to hang the pom poms with clear fishing wire, to give the illusion of being suspended in mid air.


      Looking forward to sharing with you the final room reveal!  Happy Decorating!!!!!

Sunday, March 11, 2012

Spring Fever!!!

     Hello everyone...I went M.I.A. there for a bit.  The last couple of weekends have been busy.  My family came into town to throw me an awesome baby shower, and the next weekend was spent celebrating my birthday! All of the partying definitely took me away from my decorating hobby.  I am glad to be back, and ready to tackle more projects.  But first, I need to address a bad case of SPRING FEVER!!! 

     I'm not sure if it is the gorgeous weather we have been having, the time changing this weekend, or a combination of them both, but either way, I can hardly wait for Spring!  I am longing for the days where flowers are starting to bloom and the trees are turning bright green. 

     So with Spring on my mind, I decided to decorate for the season.  I started by hanging a forsythia wreath on my door.  In Maryland, forsythia is always one of the first signs that Spring is here....


     I then headed indoors and began decorating my dining room buffet table.  I found this adorable "SPRING" banner at Target.....


     I added a bunny....


     I added some polka dot ribbon and fun colored straw eggs that I've used in previous years as napkin holders...


     And of course, I had to add some candy....my sweet tooth must be satisfied!


     Together, these small touches brought Spring indoors, and without a doubt, brightened my dining room!


          This was just the cure my fever needed...  HAPPY SPRING!

Sunday, February 19, 2012

Wreath Makeover

     Hello everyone!  I am excited to share with you my latest decorating project.  This idea came to me at the last minute, and only took me a little over an hour to complete.  Time is everything these days :-) 

    Today, I am going to share with you our foyer.  Here is what it looked like this morning before I got cracking on it.....


     As you can see, I still had Christmas decorations up.  I had convinced myself the berries were "Winter" berries, and therefore, could stay up through Valentine's Day.  Ummmm....ok.  Funny, the things we tell ourselves. 

     A change was definitely in order, but I wanted to use items I already had around my home.

     A few weeks ago, I purchased this cute sign from Home Goods.  At the time, I had no specific place in mind for where I would hang it. 


     I also had this wreath, which I purchased last year for spring.


     When I first purchased this wreath I thought it was pretty, but soon realized when I got it home that the purple and fushcia clashed with the rest of my home decor. 

     So....I decided to be daring and cut out all of the dried flowers and replace them with these berries I got from Hobby Lobby.


     I unwrapped one of the berry branches so that there were individual stems to work with.  It looked like this afterwards.


     Next, I got to work on my old wreath and began snipping away...


     What a mess!!!!!


     Once I had a clean palate, I began wrapping the twigs from the berry stems around the wreath.


     I then stuck the berry stems into the wreath.  No glue was needed; I just tucked them in tightly.


     I was happy with how it was turning out, however, it definitely needed something more. A pop of color was in order. 

     Nothing a little bit of cheetah print ribbon could not solve.....

    
     First, I folded the ribbon in even sections, making sure that there was some left over on each end for the tails.  Second, I tied a thin gold string around the center of my folded ribbon.  Third, I seperated the folded sections, bending and moving each piece until I had the desired result I was looking for.  I left the tails untouched to hang loose. 

     I got my glue gun fired up and placed the ribbon into a bare spot on the wreath.  Here is the final result......


     Now it was time to hang it up in the foyer, along with the sign from Home Goods. 

     Here is what I came up with...


     I love how it came out and even more thrilled that I used items I already had in the house.  I think it was a much needed change.

Sunday, February 12, 2012

Hobby Lobby Love


     This weekend, I got to experience for the first time, Hobby Lobby.  For those of you who have never had the opportunity to explore Hobby Lobby, and all its awesomeness (is that even a word?), it is definitely worth a trip.  Unfortunately for me, the closest store is 30 miles away.  Booooo! 

     Hobby Lobby is a mix of Michaels, Home Goods, and JoAnne Fabrics, on steroids!!!!  Let's check out some of their amazing products....


     I originally wanted to check out the store, because I heard they had an amazing array of knobs at really low prices; they did not disappoint.


     Unfortunately, the knobs I wanted were out of stock.  No worries, they ordered what I wanted, and honored the 50% off sale that was going on at the time! YESSSS!!!

     I certainly couldn't leave this place empty handed, so I picked up some of the fabulous plant stems, which also happened to be 50% off.  This was my lucky day! 

     Normally, I am not much of a fan of fake plants, but since I manage to kill almost any house plant I get my hands on, I figured it might be ok to make an exception.  Not to mention these plant stems looked pretty real even up close.

     I selected a small pot, also 50% off, a floral piece of foam to hold the stems in place, and three stems for my creation. 

     This is what I came up with....


     I think it looks pretty good for a FAKE.  Best part...I can't kill it! Woohooo!!!!  I hope you all enjoy your week. 

                                                                                                            -Molly

Sunday, February 5, 2012

Valentine's Day Decor

HAPPY FEBRUARY!!!

      I can hardly believe January is behind us and Valentine's Day is just around the corner.  I must admit, Valentine's Day is hardly the biggest holiday in our household, so I usually don't go too crazy with the decorations.  I certainly don't like to spend a lot of money.  I try to use what I already have around the house. 

     This year I decorated our buffet table in the dining room....


      I placed a white table runner along the buffet to brighten up the dark furniture.  I decided to display a monogrammed plate, which I use mostly for desserts, and added some pink ribbon for a touch of color. 

     I found the white felt hearts at Target for 10 cents a pack, in the discount Christmas decor bin.  They were originally sold as Christmas ornaments.  I don't think you can get a piece of candy for 10 cents anymore!


     I filled my apothecary jars with malt balls, yogurt covered pretzels, and cinnamon hearts.  I use these jars for every holiday, switching out the sweet treats throughout the year.  You can easily find cute jars like these at Home Goods or Michael's for reasonable prices. 


      As you can see, we have already been enjoying the yogurt covered pretzels! Yummm.

     Finally, I scored this berry wreath for 1/2 off at JoAnn's Fabrics and thought it was a nice finishing touch.


Just goes to show you that making a festive display need not be a drain on your wallet.  Be creative and see what you can come up with.

Happy Valentine's Day decorating!

                                                                                               -Molly
Scroll to Top

Sunday, January 29, 2012

In Honor of National Pie Day: "Pocket-Pies"

     This past Monday was National Pie Day.  Yes, there is an official day for pies.  Who knew?  For anyone interested, you can get more information at the American Pie Council's website here.  Did you know there was an American Pie Council? Me either....

     Anyone who knows me well, knows I love pie.  In fact it is a religion in my family.  So when I realized there was an actual day in honor of this tasty treat, I thought I must make a pie, even if I was a week late.  You may be wondering what this has to do with decorating.  Well decorating can come in all forms, including dessert!  It is all about the presentation. 

     So, I thought I would share with you my fun little gadget from Williams-Sonoma that makes mini pies.  This takes pie making to the next level.

     It's called the "Pocket-Pie Mold" and they come in several different shapes.  I think right now they are selling the apple pie shape but they switch the styles often.  Don't these look delicious?  Of course Williams-Sonoma's pies are absolutely perfect!

Apple Pocket Pie Mold
     I have a heart shape mold and thought it would be a great time to use it with Valentine's Day on the horizon. 


     First, you will need to make your own pie crust.  If you are short on time you can purchase pre-made pie crusts from the grocery store.  Although, I must say homemade crust is soooooo much better!


    I decided to make strawberry pies because the filling is pretty simple.  You can easily substitute any fruit pie filling you enjoy. 

     The directions on how to make the pies are on the back of the "Pocket-Pie Mold" box and very self explanatory.  The basic idea is as follows: you will use the mold to make cut outs in your dough.; then place the solid cut out in one side of the pocket pie; place one or two tablespoons of your fruit filling in the pie crust; brush your edges with egg wash;  then lay the cutout with the small heart cut out on top; last, bring the other side of the pocket pie over and press to seal you pie.


    Place these little pretties on a cookie sheet and sprinkle with sugar.  Bake them in a 400 degree oven for 15-20 minutes or until golden brown. 

     Yummmmmmm.............


     Obviously, my pies are not as perfect as the ones displayed in the Williams-Sonoma photo above, but I think they still look pretty yummy. 

     These pies would make great gifts. Just pop each one in a cellophane bag, add some cute ribbon, and you got a tasty homemade Valentine! 

     So in honor of National Pie Day, I challenge you to tackle a pie recipe.  Find a fun gadget like the "Pocket-Pie Mold" to add that extra special touch.  Happy pie making!!!! 

                                                                                                                     -Molly